Adding an asset
An asset is an object or physical entity that requires periodic inspection, maintenance, or repair. Assets could include:
- Mechanical equipment, such as HVAC equipment, pumps, heat exchangers, and boilers
- Mobile equipment that has no fixed location, such as vehicles
- Buried pipes, valves, and vaults or subsurface structures
Watch the video tutorial:
How to add an asset
- Click on the Assets menu icon, then select Assets.
- Click on New.
General
The General section contains the most detailed information for your Asset.
- Enter any applicable information you can here, including Asset Name, Asset #, Make and Model information, Purchase information, as well as Asset Status, Asset Condition, and Criticality. *Note: The Purchase Date, Purchase Price, Replacement Cost, Expected Life and Salvage Value fields provide the necessary data to allow Asset Essentials to calculate important management functions like life cycle analysis and remaining expected life.
- If you plan to print barcode labels for your assets, enter a Barcode number. This is also where you would enter a non-Asset Essentials QR code value for the Asset, if you are using them.
- We recommend selecting a Category for your Asset. *Note: Categories are fully customizable and are an important aspect of organizing Assets and Parts. To learn more about how to set up Categories in your account, see Adding Categories.
- In order to allow for this asset to be "checked out" or assigned to a Crew, check the box next to Allow sign-out.
- Select a Site and Location to determine where the asset is located. *Note: If the Site or Location has an address associated with it, any work order tied to this asset will automatically plot a point on the Esri map based on the address.

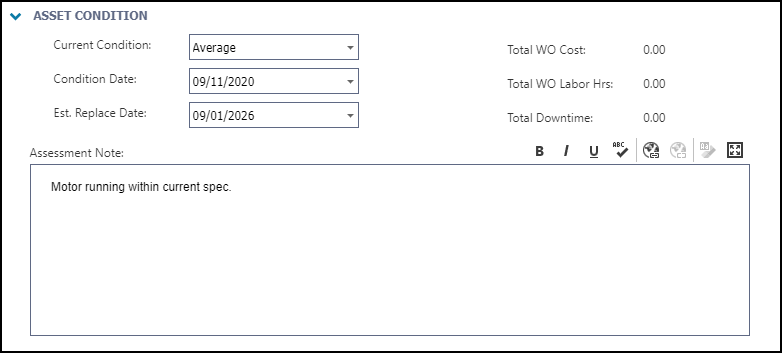
Asset Condition
Use this section to track the condition of your asset.
- Select the Current Condition from the drop-down menu.
- Select the Condition Date and Est. Replace Date from the drop-down menus.
- The Total WO Cost, Total WO Labor Hrs, and Total Downtime will be calculated and displayed in these fields automatically.
Warranty tracking
Use this section to track any warranty information for this asset.
- Enter the Warranty Title.
- Select the Warranty Expiration Date from the pop-up calendar.
- Click the vendor icon (
) and select the Warranty Vendor by clicking the plus sign icon (
) next to the vendor name.
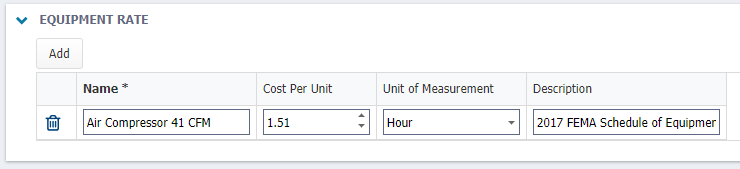
Equipment Rate
This section allows you to define the operating costs for this Asset. *Note: To use the Equipment Rate feature, Allow sign-out must be checked in the General section.
- Click the Add button.
- Enter the Name of the Rate.
- Enter the Cost per Unit.
- Select the Unit of Measurement from the drop down menu.
- Type a Description if necessary.
Assigned to
Use this section if responsibility for asset maintenance falls to the same person(s) regardless of frequency. This will automatically assign a work order with this asset to the selected users if the Work Order template has been set up to assign from the Source Asset/Location/Site.
- Click the Select User or Select Me icons at the top to either select yourself or another user whose information is already populated in Asset Essentials.
Emergency
Use this section to assign person(s) to be notified of emergency conditions for the asset.
- Click the Select User or Select Me icons at the top to either select yourself or another user whose information is already populated in Asset Essentials.
- Click Add to type in an assignee's information manually.
Associated assets
Complex Assets may be linked to other assets. Use this section to identify those other Assets.
- Click on the Select Asset gear icon to select an Asset(s) to list here.
Notes
This section gives the opportunity to add various notes to the Asset.
- Enter general notes, as well as Tool Crib Notes, Purchase Notes, Warranty Notes, Emergency Notes, Safety Notes, Training Notes, Shutdown Procedure Notes, and LOTO Procedure Notes as needed.
- Use the word processing buttons at the top of each section to format your text, or add a link.
Photo
This section allows you to attach a photo to the Asset.
- Click on the Select Document/Image icon to either select an image from the Documents Library, or add an image from your computer.
Documents
Use this section to attach documents, like user manuals, POs, packing slips, or any other Asset related documents.
- Click on the Select Document icon to either select a document from the documents library, or add a document from your computer.
- Click Save at the top of the screen to add this Asset to Asset Essentials.
If you need to enter multiple Assets that are similar, you can use the Duplicate feature. For example, if you have two air handling units, and the only difference between them is where they are located and their serial number, the duplicate feature allows you to edit only the serial number and Location for the second asset, and the rest of the data will have carried over.
- Once you have entered the first Asset, click on the Assets menu icon, then select Assets to access a list of all assets entered into Asset Essentials, right click on the asset you would like to duplicate.
- Select Duplicate and a new Asset entry form will appear with all the data copied.
- Edit whatever is different for the second Asset, and then click Save.
- Repeat this process as needed for any similar Assets.
